
Faux Stained Glass Easter Eggs


To make these "Faux Stained Glass Easter Eggs":
- Start with empty eggs. Here is a technique I find works well.
- Create your dye baths. After some experimenting I have decided that food coloring creates the most effective dye.
- Dye your eggs by letting them float in the different dye baths. Switch them out periodically and let the colors overlap.
- Dry your eggs. Here are the directions for a pin-board egg drying rack.
- Use a fine tip glue applicator to draw lines at the separation of each color. I also like to use the glue/glitter to cover up the emptying hole on each egg.
- Sprinkle with a fine glitter and let them dry.
- Voila! you have colorful sparkly eggs reminiscent of stained glass.
Shell Portrait of Glenn Eure

On a recent trip to the Outer Banks I had the good fortune to meet the artist Glenn Eure. I read about him and his gallery in my travel guide and was excited to go check his artwork out in person. As the only visitor on that cold rainy December afternoon I had him all to myself and spent the better part of an hour talking to him about his art work, printmaking techniques, history, and the drawing lessons he likes to share with his younger fans. When I got home I decided to make a thank you gift for him to show my appreciation for the generosity he showed me with his time and drawings. To check out Glenn Eure's art work and Ghost Fleet Gallery for yourself go to www.glenneureart.com or 210 E. Driftwood St. (in Gallery Row) Nags Head, NC 27959
 I started by laying out all the shells I had gathered along the beach during my trip for inspiration.
 I selected two shells: one for Glenn's head and one for his body. I also gathered two blue crystals for his eyes. I then made a pair of glasses from some wire and a miniature paintbrush from the top of an old paintbrush and a toothpick.

After assembling these elements I addressed Mr. Eure's trademark red beret. I bent some wire in the shape of his hat and wrapped this with red velvet hot gluing it into place. I stitched on a few beads to represent the medals.


I hot glued it all together for the final assembly and put it in the mail. I hope he enjoys his miniature shell self:)
Singed Edge Flower Hair Clip

1) Gather Supplies: synthetic satin fabric, scissors, candle, embroidery floss, beads, alligator clip, and felt.

2) Iron fabric.

3) Cut multiple circles in descending sizes.


4) Singe edges of fabric circles. Hold the fabric above the flame (not directly in the flame). As the edge curls turn the fabric until the entire edge has curled. Be careful not to let the fabric catch on fire!


5) Embellish the center of the flower with beads.


6) Stitch the alligator clip to a piece of felt.


7) Sew the felt wih clip attached to the bottom of the satin flower.


Woven Pouch

~ thin piece of cardboard (cracker/cereal box).
~ smooth string or twine for the warp.
~ various yarns for the weft.
~ scissors.
~ item you want to fit into the pouch.
~ weaving needle.
~ bead or button to create a closure.
~ ruler.
~ tape.

2) Measure the item you want to fit into the pouch. In this example my phone is approximately 4 1/2" x 2 1/2".

3) Cut a rectangle (11"x 3 1/2") of cardboard to create your loom. Length= twice the length of your item plus 1" and some extra to account for the depth of your item and a flap (optional). For me my cardboard is 11" long so I'll have to skip the flap. Width= the width of your item plus some extra to account for the depth of the item. For me 3 1/2 should work. Remember the carpenter's motto "measure twice, cut once".

4) Measure down and draw a line 1/2" from the top and bottom of your loom.

5) Measure and draw a line at each 1/4" along the strip at the top and bottom of your loom.


6) Cut each of those 1/4" vertical lines, creating notches or teeth.

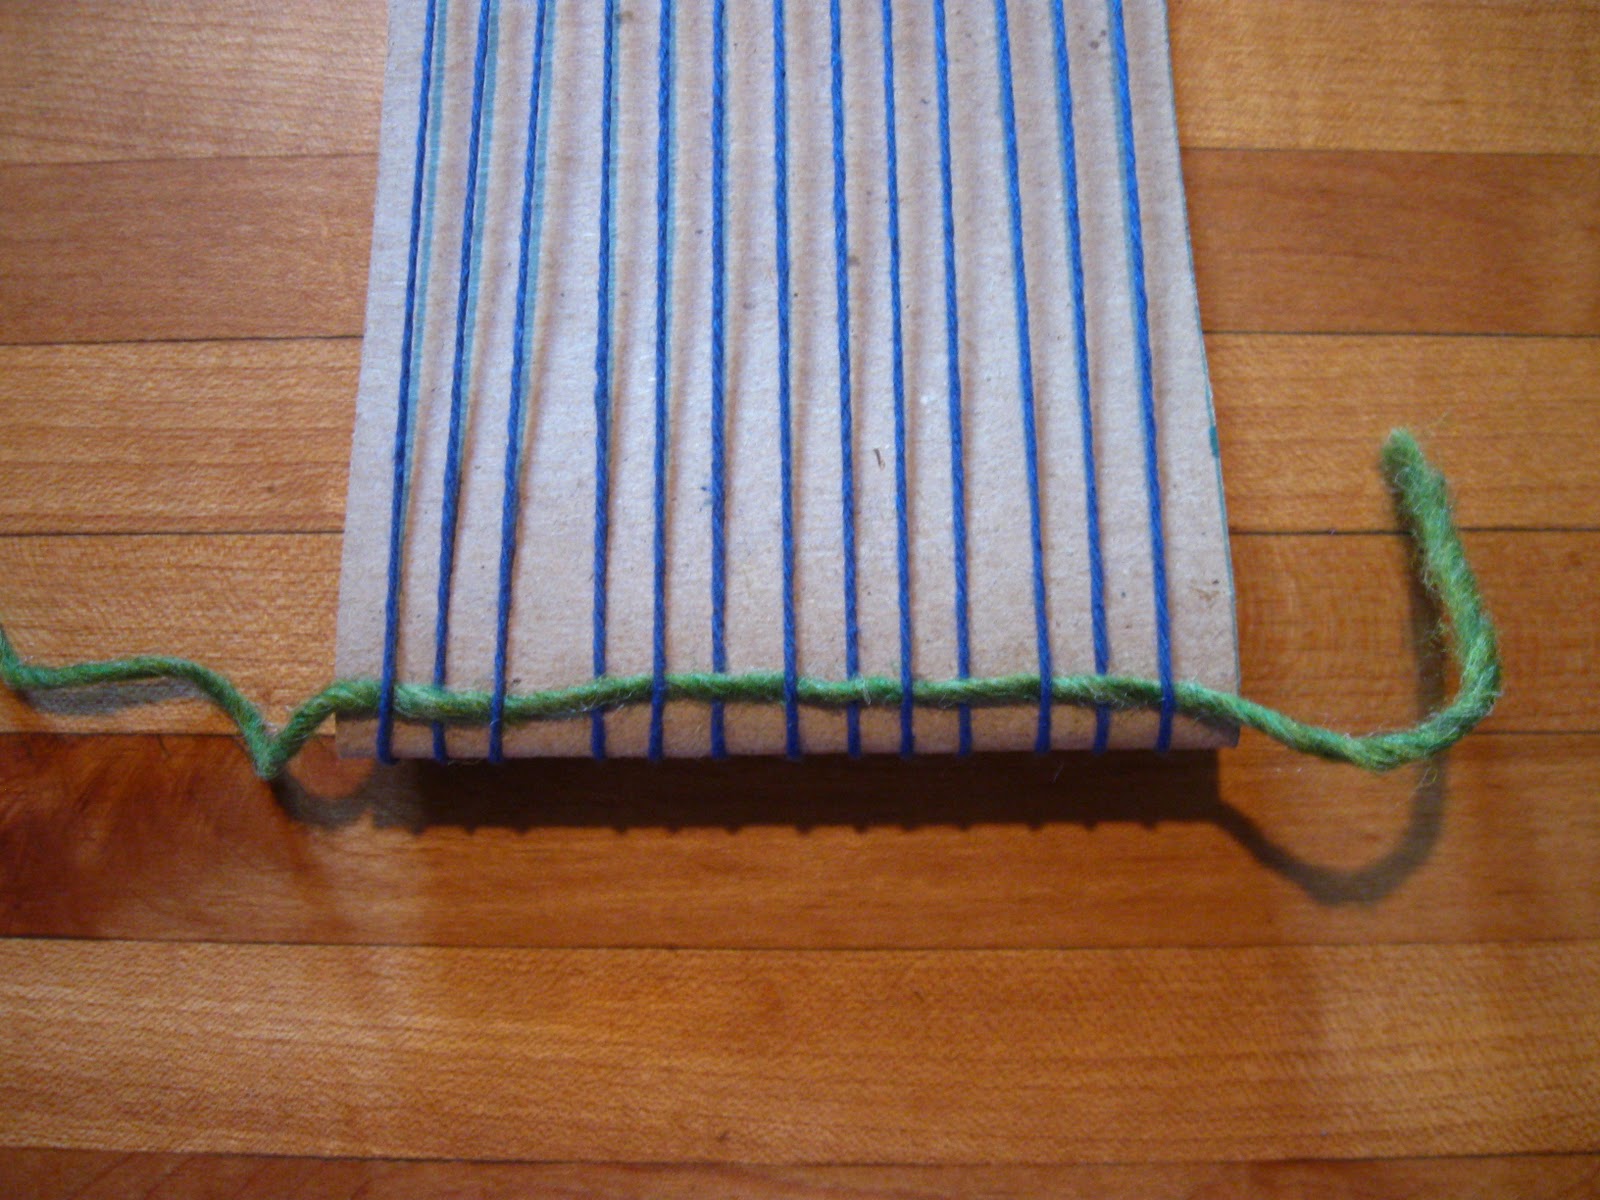
7) Warp your loom: Use a thin, strong, smooth thread for this. Wait to cut the thread until you have completed the warping of your loom. Start by flossing through the first gap in your teeth. Tape the beginning of the "floss" down on the back. Now pull the thread down and floss through the last gap on the other end of your loom. Go around the back of the next tooth and up through the next gap. Do this all the way across until you have flossed all of the gaps. Now you can cut the thread and tape the end to the back of your loom. You will have parallel lines on the front of your loom. On the back you will see dashed lines along the teeth and the taped beginning and end of your thread.


8) Fold your loom and tape it closed.

9) Thread your needle: An alligator (small folded piece of paper) is a helpful tool for getting fluffy yarn through the eye of the needle. Tie a knot in the end of the yarn to secure it. If you don't have a weaving needle you can use a pencil, just tape your yarn to the end.


10) Now you can begin to weave over, under, over, under through your warp threads at the bottom of your loom (the end with the fold). Pull the yarn through leaving a little tail. Now flip the loom over and continue on the other side. It's unnecessary but I'm tying a knot here, you can just leave the tail loose and trim it off later. Now you flip the loom again and weave your second row. You will do the opposite pattern for this row: under, over, under, over across. Continue to flip and weave the rows in the opposite pattern of the preceding row. In effect you are weaving around the loom.


11) When your finished with your first color: select your next yarn, weave it through one row, tie it to the end of your old thread and keep going.


12) Continue weaving until you fill up your whole loom. Press the weft (woven yarns) down as you go to create a tighter weave. This step takes the most time. I like to create a small weaving box and keep it handy for when the mood strikes.


13) Remove the tape covering your looms "teeth".

14) Reach inside your loom and pull out the beginning and end of the warp thread.

15) Tie your warp thread to your last weaving (weft) thread. Then weave through one more row to tie your weft to the other end of the warp.


16) Unhook the looped warp thread from the teeth of the loom. Pull the pouch off the loom.


17) Turn the pouch inside out, add a strap if you like , and off you go.


*If you had enough cardboard length for a flap you would fold your loom like this.
*Here is a finished pouch with a flap.
*To weave the flap portion of the loom you just go back and forth as opposed to the weaving in the round technique you used for the body of the pouch.


Here is a link to video instructions for removing the woven pouch from the loom:
Subscribe to:
Comments (Atom)